|
Structural Bioinformatics Library
Template C++ / Python API for developping structural bioinformatics applications.
|
|
Structural Bioinformatics Library
Template C++ / Python API for developping structural bioinformatics applications.
|
Manual guiding a contributor for using the SBL library.
The following section details the architecture of the git of the SBL. The architecture is of prime importance for all collaborators contributing to the SBL.
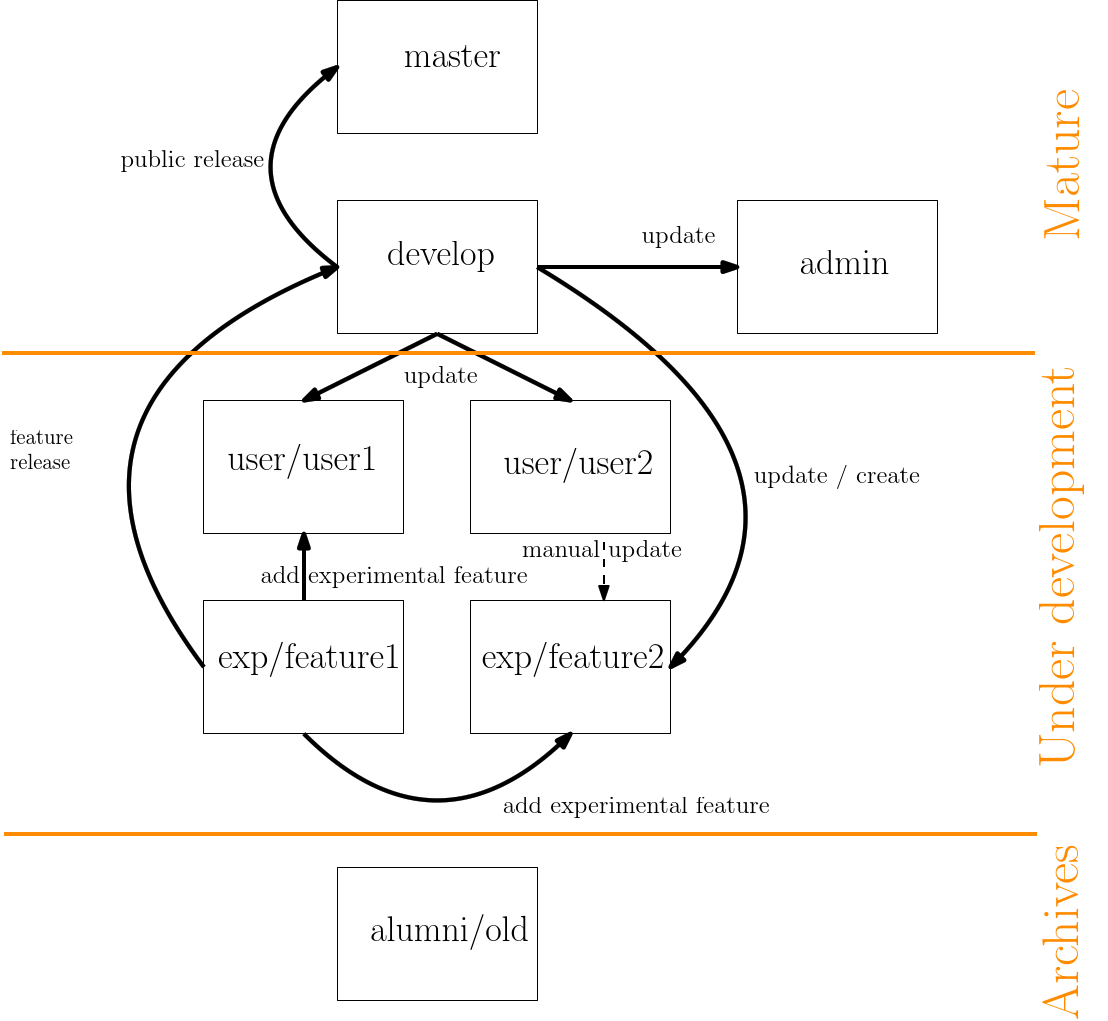 |
| Overview of the git architecture: boxes represent the different types of branches and arrows the permitted operations between branches. The three categories of branches are the mature branches, the branches under development, and the archives. |
The code released is stored in the master branch. The master branch is only used for public purposes and is never directly edited. In particular, it is only updated by merging from the develop branch, as specified in the next section. Note that the master branch exists on two repositories : the GForge repository, only accessible from contributors, and the sbl.inria.fr repository, accessible from every body. All other remote branches are only available from the GForge repository.
The pre-production of the library is represented by the develop branch. The develop branch is used for three purposes :
to update the production.
to share between all contributors all the code which is in production, and is about to migrate to the master branch.
Basically, updating the production consists on a simple merge :
> git checkout master
> git merge origin/develop
Similarly, updating a particular branch so that it is up to date with the develop branch is a simple merge.
In order to ease the development and the sharing of experimental features, each such feature should be developed in separate branches. For example, developing a new algorithm for computing the potential energy of a molecule will be done in a new branch. The name of those branches are determined by the prefix "exp/", followed by a short name for the feature (e.g exp/energy). First, one should create this branch locally from the develop branch:
> git branch exp/energy origin/develop
> git checkout exp/energy
Once the work is ready to be shared, the branch has to be pushed on the GForge repository, commonly called origin :
> git push -u origin exp/energy
Note that the option -u is a short-hand for –set-upstream, allowing to track the branch being pushed onto a repository. If a collaborator want to access this particular feature, he has to track the corresponding branch :
> git checkout --track origin/exp/energy
Once the feature is enough stable and should be included in the production, it is merged into the develop branch :
> git checkout develop
> git merge origin/exp/energy
Note that once a feature is integrated into the develop branch, the branch of the feature is no more living and has to be deleted :
> git push origin :exp/energy
Note the : just before the name of the branch to remove : it means that the remote branch should be replaced by nothing, i.e it is deleted. It is also possible to use a feature exp/energy not yet in develop into another feature exp/more-energy :
> git checkout exp/more-energy
> git merge origin/exp/energy
Personal laboratories are branches specific to a collaborator - contributor to the SBL. There name are prefixed by "user/" followed by the login of the corresponding collaborator. A personal laboratory is created from the develop branch and should never be merged into any other branch : it is a personal version of the library containing the work of a collaborator. Creating a personal laboratory is done as :
> git branch user/login origin/develop // create from origin/develop
> git checkout user/login              // move into the new branch
> git push -u origin user/login        // push the branch and track it
In order to be up-to-date with all the recent works that is integrated into the production, one has to merge the develop branch regularly into its own branch :
> git checkout user/login
> git merge origin/develop
Note that you should always commit your work before making any merge operations : if you are already in the branch you want to update, the checkout command will revert all your unstage modified files to their last commit version. It is also possible to use experimental features not yet integrated into the develop branch :
> git checkout user/login
> git merge origin/exp/energy
A common case is that of a feature is developed on a personal laboratory, until the point where this feature is mature enough to be shared with other collaborators, or even in production. It is a better practice to develop a feature as soon as possible on a separate branch, but if it is not the case, the contributor has to create a new feature branch from develop, and to manually copy the modified / new files from its feature into this new branch :
> git branch exp/energy origin/develop           // new branch for the specific feature
> git checkout exp/energy                        // move into it
> git diff user/login > diff.txt              // files which differ in user/login
> git checkout user/login -- /path/to/my/file // pull version from user/login
Note that the diff command is used for targeting which files differ from the develop branch, so that it is easier to group files to include in the new branch. The last command allows to copy one by one those files / directories into the new branch. Note that if there is an existing file / directory in the same path, it will be replaced with no warning.
When a collaborator is no longer working on the SBL, its branch is renamed "alumni/login" :
> git branch alumni/login origin/user/login // create new branch
> git push -u origin alumni/login              // push the branch and track it//
> git push origin :user/login                  // delete the old remote branch
The administration part of the SBL is represented in the admin branch and is never used for updating any other branch. In particular, it contains the folders administration, website and sbl-scripts-devel. It is also the branch that contains the script that automates the update of the website and of the production branch. In order to work properly, the admin branch should be regularly up-to-date with the develop branch.
In the following, we provide selected recommendations for C++ coding.
Programs from the SBL typically dump their output into xml files, which is especially convenient to parse these output and compute statistics – see the package PALSE.
On the other hand, the algorithms themselves may dump run level statistics and/or concise high level statistics. Note that by high level statistics we refer to simple / overall statistics, as opposed to exhaustive statistics which are dumped into xml files. The level of information provided to the user is controlled by a verbose level, specified as follows:
Summarizing, the following is recommended:
types, attributes, constructors, functors (if any), functions sorted by functionality.
(//! @} Accessors @{).
Template parameters: single word (no blank), first letter of each word capitalized.
Template classes: prefixed with "T_", then the first word starting with a capital letter, then the remaining words separated by underscores.
All other types: first letter capitalized, remaining words separated by underscores.
As of early 2020, unless otherwise stated, all packages are C++ compiled with the directives
set(CMAKE_CXX_STANDARD 14)
set(CMAKE_CXX_STANDARD_REQUIRED ON)
Those packages using more advanced features of C++ must adapt their CMakeLists accordingly.
The following generic architecture is used for all packages:
Package_name
Package_name/include/SBL/{CADS, GT, CSB, IO}
Package_name/src
Package_name/python/SBL
Package_name/scripts
Package_name/demos/Package_name/{data, whatever}
Package_name/examples/Package_name
Package_name/tests/Package_name
Package_name/prod
It is recommended to used these directories as follows:
Package_name/include/SBL/{CADS, GT, CSB, IO}: for packages from the core, include files, ascribed to the following categories: CADS: combinatorial algorithms and data structures, GT: geometry and topology, CSB: computational structural biology, IO: input output.
Package_name/src: directory hosting the source code of cpp files compiled and to be installed at the user's convenience. The directory is primarily meant for application packages, but core packages offering generic utilities also provide one.
Package_name/python/SBL: optional directory meant to host package specific python modules (Nb: general/generic python modules are found in $SBL_DIR/python/SBL). We note in passing that the directory $SBL_DIR/python/SBL contains a mechanism (function make_modules_path()) browsing all such directories, and storing them in one's Python path. (Nb: use the command from SBL import xxx to import the module xxx.)
Nb:
Package_name/scripts: optional directory containing all scripts of the package, include the python ones.
Nb:
Package_name/prod: optional directory hosting python utilities which are convenient to run large scale experiments / have been used to write (a) publication(s) accompanying the package.
Package_name/demos/Package_name: directory containing data files for demos, and possibly demo scripts. Examples from the documentation are run from this directory, assuming an access to the various executables and python scripts.
Package_name/examples/Package_name: example programs / scripts, illustrating features and/or functionalities of the package.
Package_name/tests/Package_name: (ideally) units tests for the package.
Jupyter notebooks are used to give live demos of functionalities of applications – and also of selected packages.
Similar to that of an Application package, with the specific section Applications and Notebook:
Applications
The goal is to provides a concise example illustrating (i) how to perform a calculation, and (ii) how to exploit the results, ideally using PALSE.
To ease the adoption of SBL functionalities, it is recommended to deliver python code providing two types of functionalities: (i) running the executables, (ii) performing simple analysis. This python code should preferably be developed in the module Package_name/python/SBL/Package_name.py
The general python module SBL_pytools.py provides several classes with useful functions:
Such python modules can then be used directly from Jupyter – just make sure sure sbl/python/SBL is in one's PYTHONPATH environment variable:
# Using the general python tools
from SBL.SBL_pytools import SBL_pytools as sblpyt

# Using python code specific to a package
from SBL import Structural_motifs

help(sblpyt)
As an example, one may consult Structural_motifs and the associated notebook.